
TL;DR
Moving your rig into a closet or separate room dramatically cuts noise—more than foam or absorption. Proper placement, sealing leaks, and ventilation are key to a quiet, effective setup.
Ever notice how your noisy AI workstation feels like a jet engine? It turns out, the biggest noise-reducer isn’t foam or fancy dampening mats. It’s where you put the rig and how you treat that space. Moving your high-power setup into a closet or another room can cut noise way more than any acoustic panel ever could.
In this guide, you’ll learn why placement beats absorption and how to turn a small closet into a near-silent powerhouse—without turning it into a sauna. Ready to make your workspace peaceful and your rig cool? Let’s go.
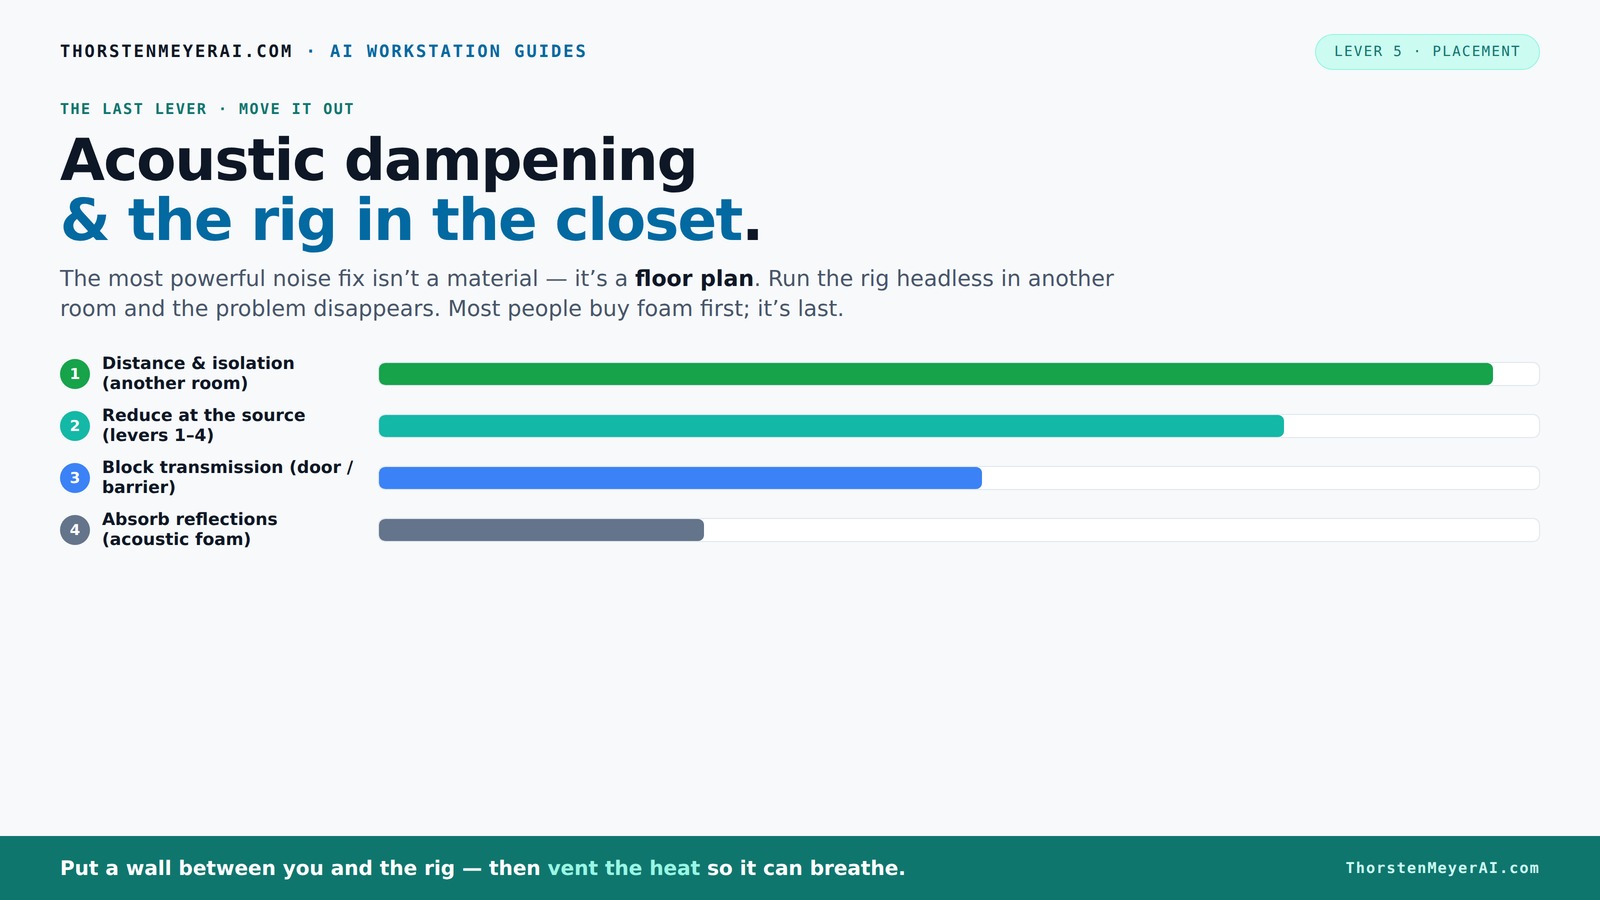
Acoustic dampening
& the rig in the closet.
The most powerful noise fix isn’t a material — it’s a floor plan. A rig you can’t hear because it’s in another room beats any amount of foam. Tap the approaches in Part 1 to see what actually works.
(another room)
(levers 1–4)
(door / barrier)
(acoustic foam)
Contain the noise, not the heat
Key Takeaways
- Moving your rig to another room or closet is the most effective way to cut noise—more than foam or absorption.
- Proper ventilation is essential when placing a rig in a sealed closet; hot air needs a way out to prevent throttling and overheating.
- Target reflection points first: treat the walls, door edges, and ceiling where sound bounces into your mic.
- Seal all leaks around doors, outlets, and vents to stop sound from sneaking out.
- Bass traps in corners help tame low-end muddiness in small spaces, making your recordings clearer.
soundproof closet for computer rig
As an affiliate, we earn on qualifying purchases.
As an affiliate, we earn on qualifying purchases.
Why Moving Your Rig is the Easiest Noise Hack
The biggest noise reduction trick? Distance. When your rig is in another room, it’s practically inaudible from your desk. Think of it like a loud neighbor—you’d rather hear their TV from a mile away than from right next door.
Putting your rig in a closet or spare room means you’re not just hiding the noise; you’re removing it from your workspace entirely. That’s why, according to experts, moving the machine wins over acoustic foam every time. It’s about reducing the sound that reaches your ears, not just softening it.
Plus, with a wired network and some ventilation, you keep your rig cool — no overheating or throttling. This approach is perfect for AI workloads that run 24/7, where noise and heat are the main enemies.
The 'Rig in the Closet' Setup — Why It Works and What to Watch For
Putting your rig in a closet sounds perfect—quiet, out of sight, out of mind. But here’s the catch: heat. A sealed space traps heat, and that heat can cook your components faster than you think.
To keep it cool, you need ventilation. There are specially designed soundproof cabinets that combine foam with active airflow, but even a simple vent or a small fan can do wonders.
For example, a creator in a small apartment turned a closet into a silent, cool inference rig by installing a quiet fan and sealing gaps around the door with weatherstripping. The result? Near-silent operation and stable temps, all while avoiding throttling due to heat.
Choosing the right ventilation method involves balancing noise levels and airflow. A fan that’s too loud defeats the purpose of quieting the space, so selecting a low-noise model or adding sound dampening around the vent can help. The tradeoff here is between effective cooling and maintaining silence; neglecting proper airflow can lead to overheating, while overdoing it with noisy fans can reintroduce unwanted sound.
Acoustic Dampening vs. Soundproofing — What’s the Real Difference?
Acoustic dampening and soundproofing are often used interchangeably but serve different purposes. Dampening absorbs reflections inside a space—think of it like softening echoes inside your closet with blankets or foam.
Soundproofing blocks sound from leaving or entering. It’s about sealing gaps, adding mass, and using barriers—like heavy doors or drywall—to prevent noise from escaping or coming in.
For instance, adding foam inside your closet reduces echo and makes recordings clearer. But sealing the door edges with weatherstripping stops sound from leaking into your room. According to soundproofing experts, both are needed for a truly quiet setup, but the priority depends on your goal.
Understanding the tradeoff is key: dampening improves clarity and reduces internal echo, which is crucial for recording quality, but it doesn't prevent sound from escaping. Soundproofing, on the other hand, often involves adding mass and sealing gaps, which can be more costly and labor-intensive but is essential if you need to keep noise from leaking out or outside noise from coming in. Balancing both approaches based on your needs is the best strategy for a professional-sounding, quiet workspace.
Placement Tricks: Where to Put Acoustic Panels for a Closet Booth
Placement is everything. The first step: identify the main reflection points—usually the walls directly opposite your mic, behind your head, and around the door.
In a tiny closet, treat the ceiling, side walls, and door edges first. Use a mirror trick: place it along the wall to see where reflections bounce into your mic and stick panels there.
For example, a YouTuber layered foam on the door, behind the mic, and in the corners to tame low-end rumble. This targeted approach beats covering every surface in foam, which can deaden the room unnaturally.
Proper placement of acoustic panels matters because it directly influences the sound clarity and naturalness of recordings. Covering reflection points reduces comb filtering and echoes, which can make recordings sound dull or boxy. In small spaces, strategic placement ensures you’re not wasting materials on areas that won’t impact sound quality, and instead focus on critical reflection points for the most effective sound treatment.
Sealing Leaks: Stop Sound from Sneaking Out of Your Closet
Cracks, gaps, and open edges are the weak links in any soundproofing effort. Even tiny holes around the door, outlets, or vents let noise escape.
The fix: weatherstripping, acoustic sealant, or draft stoppers. A simple door seal kit can cut noise leaks by up to 80%. For example, a streamer sealed gaps around his closet door with weatherstripping and noticed his neighbors no longer complain about his late-night sessions.
Don’t forget outlets and vents—cover or seal them carefully, or install ducted soundproofing if needed. Sealing leaks is vital because even small openings can significantly undermine your entire soundproofing effort, allowing noise to escape or external noise to intrude. The tradeoff is that over-sealing can make access difficult or trap heat, so balance is key. Use removable or adjustable sealing methods to maintain accessibility while minimizing sound leaks.
Floor, Ceiling, and Desk: The Hidden Reflection Points
Small rooms bounce sound around—especially the floor and ceiling. In a closet, the ceiling often reflects sound directly into your mic, making recordings sound ‘boxy’.
Use rugs, foam, or blankets on the floor. For the ceiling, lightweight panels or hanging acoustic tiles work well. Covering reflective surfaces like hard desks or shelves reduces flutter echoes and improves clarity.
A creator placed a thick rug under his mic stand, and added foam tiles on the ceiling. The result? A warmer, more natural sound that feels less 'dead.'
Addressing these reflection points is essential because they can cause comb filtering and early reflections that color your recordings, making them sound unnatural or harsh. Properly treating these surfaces reduces unwanted echoes and creates a more balanced, natural sound, which is especially important in small, enclosed spaces where sound bounces easily.
When Do You Need Bass Traps in a Closet?
Bass traps are crucial if your small booth sounds muddy, especially in the low frequencies. They sit in corners, absorbing deep rumble and preventing low-end buildup.
If your recordings have a boomy or muffled quality—common in tiny, parallel-walled closets—adding bass traps can clear things up. For example, a voice-over artist installed corner traps and immediately noticed a tighter, clearer sound.
In small spaces, thinner panels or DIY traps filled with mineral wool can do the job without breaking the bank. The key is understanding that low frequencies tend to accumulate in corners due to boundary reinforcement. Neglecting bass trapping can leave recordings with a muddy or boomy quality that’s difficult to fix later. Proper placement and choice of materials ensure that low-end response is tight and natural, making your recordings sound professional without costly investments.
Budget DIY vs. Permanent Soundproof Builds — What’s Right for You?
DIY solutions like blankets, foam, and weatherstripping are cheap and flexible. They’re perfect if you’re experimenting or on a budget.
For a more permanent, professional setup, consider adding extra drywall with damping compounds, sealed panels, or custom soundproof cabinets. These are pricier but last longer and block more noise.
A small YouTuber built a DIY booth with moving blankets and foam, which drastically cut noise. Meanwhile, a pro studio used layered drywall and specialized enclosures for near-zero leakage. Choose based on your needs and budget. The tradeoff here is between flexibility and effectiveness: DIY solutions are quick and inexpensive but may require regular adjustments, whereas professional builds provide long-term, consistent performance at a higher upfront cost.
Common Pitfalls: Too Much Foam, Wrong Placement, and Ignoring the Door
Over-treating with foam can deaden your sound or make your closet feel like a cave. Place panels at reflection points first, then experiment.
Ignoring door gaps is a mistake—sound leaks out or in, defeating your efforts. Always seal edges and check for leaks.
Another trap: relying solely on absorption without addressing heat or airflow, which can damage your rig over time. Think of your setup as a delicate balance between quiet and cool. Over-treating can lead to unnatural sound or space issues, while neglecting airflow risks overheating and hardware failure. The key is strategic placement and considering ventilation as part of your soundproofing plan.
How to Test Your Closet’s Sound Quality After Treatment
Once you’ve done your treatment, test the sound by recording a simple vocal or playing a test tone. Listen for echoes, low-end muddiness, or leaks.
Use a smartphone or microphone to record in different spots. If the sound feels controlled and clear, you’re on the right track. If not, revisit reflection points or leaks.
In a real-world example, a creator used a frequency sweep and noticed residual bass buildup. Adding corner traps and sealing gaps cleaned that right up. Regular testing ensures that your treatment remains effective over time and helps identify new problem areas as your setup evolves.
Frequently Asked Questions
What’s the difference between acoustic treatment and soundproofing?
Acoustic treatment improves sound quality by reducing echo and reflections inside a space. Soundproofing, on the other hand, blocks sound from escaping or entering the room. Both are important but serve different goals.
Where should I place acoustic panels in a closet booth?
Place panels at the main reflection points—usually behind your mic, opposite the mic, and on the ceiling. Use a mirror trick to find the spots where sound bounces directly into your mic and treat those first.
Do I need bass traps in a small closet?
If your recordings sound boomy or muddy, especially in the low frequencies, adding bass traps in the corners helps. They prevent low-end buildup and give your voice clarity.
How do I stop sound leaks around the door?
Seal gaps with weatherstripping or acoustic sealant. Covering the door with a blanket or adding an acoustic door sweep can also reduce leaks significantly. These small steps make a big difference.
Can I build a quiet closet booth without major renovations?
Absolutely. Using blankets, foam panels, and sealing leaks can turn a closet into a decent vocal booth without breaking the bank. For better isolation, consider adding extra drywall or specialized panels later.
Conclusion
Think of your closet as a mini sound fortress. The secret isn’t just foam or panels but smart placement, sealing leaks, and giving your rig room to breathe. When you treat the space right, noise becomes a thing of the past—and your work sounds professional, no matter how tiny the setup.
Remember: the best noise reduction isn’t about fighting sound; it’s about directing it away. Your quiet, cool workspace awaits — all you need is a plan and a little ingenuity.